
Adding balance to a Sandbox account
In Sandbox, it is possible to simulate account balance to validate flows that depend on financial transactions, such as transfers, payments, anticipations, withdrawals, and other operations that require available funds.
Since the Sandbox environment does not process real financial transactions, the balance must be generated artificially to allow these tests to be performed.
When to use
Balance simulation is recommended when your integration needs to test features that depend on financial resources available in the account, such as:
- Pix transfers.
- Transfers between Asaas accounts.
- Charge payments.
- Anticipations.
- Balance inquiries.
- Custom financial flows.
Without available balance, some of these operations may return errors related to insufficient funds.
Recommended flow
The most common process for adding balance to a Sandbox account consists of:
- Creating a fictitious customer.
- Creating a charge using boleto or Pix as the payment method.
- Manually confirming the receipt of the charge.
- Using the received amount as available balance for testing.
Simplified flow:
Create customer
        ↓
Create charge
(Boleto or Pix)
        ↓
Confirm payment
        ↓
Balance made available
in the Sandbox account
        ↓
Execute financial tests
Creating the required resources
Before adding balance, you must have:
Customer
The charge must be linked to a previously registered customer.
The minimum fields typically used are:
- name
- cpfCnpj
See also:
- Create customer
Charge
After creating the customer, create a charge using one of the payment methods compatible with confirmation in Sandbox:
- BOLETO
- PIX
After the charge is created, it will be available for confirmation.
Confirming the payment
When creating a charge with payment via boleto or Pix, a button becomes available in the interface to confirm the payment of that charge.
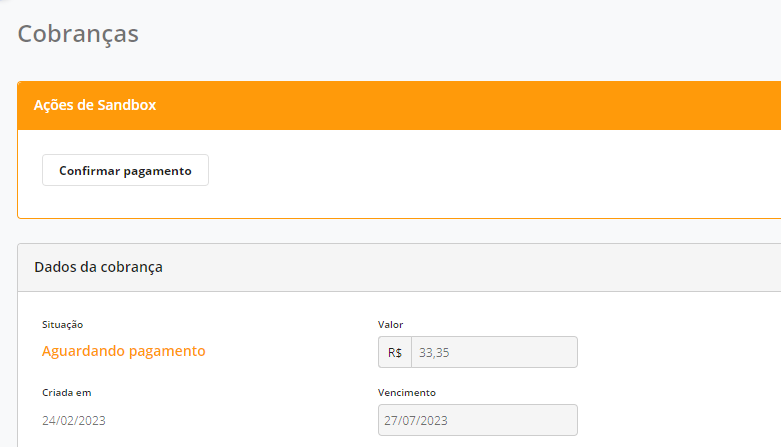
After confirmation, the charge amount becomes part of the available balance in the Sandbox account.
This balance can then be used normally in subsequent tests.
Confirmation behavior
The confirmation performed in Sandbox is intended exclusively for testing purposes.
When confirming the payment:
- No real financial transaction is executed.
- No financial institution is contacted.
- No funds are moved outside the Sandbox environment.
- The receipt is recorded solely to simulate the operation.
The balance is usually made available immediately after confirmation.
Practical exampleAn integration that needs to test a Pix transfer can:
- Create a fictitious customer.
- Generate a Pix charge for R$ 500.00.
- Confirm the payment of the charge.
- Use the simulated R$ 500.00 to execute the desired transfer.
Best practices
- Use fictitious customers and documents during testing.
- Generate only the amount of balance necessary to validate the desired scenario.
- Recreate the complete flow whenever you need to validate receipt journeys.
- Validate your integration's behavior after payment confirmation, simulating the flow that would occur in production.
Confirmation in BaaS accountsThere is also a specific endpoint for payment confirmation via API in Sandbox scenarios.
See the reference at Sandbox Actions, where the following calls are available:
- confirm payment
- force a charge to become overdue
Possible difficulties
If the confirmation button is not available, check whether:
- The charge was created in the Sandbox environment.
- The payment method used is compatible with manual confirmation.
- The charge has not already been confirmed previously.
- The charge remains in a status eligible for confirmation.
Next steps
After adding balance in Sandbox, you can test:
- Pix transfers.
- Transfers between Asaas accounts.
- Anticipations.
- Balance inquiries.
- Financial statements.
- Custom financial flows.
Updated 21 days ago