Common questions
Enabling LOGs
To be able to thoroughly analyze any possible errors encountered when using the Plugin, it is essential that Asaas LOGs are enabled.
To enable them, navigate to the WooCommerce Payments menu, available in Settings, and by accessing the management options of any payment method available by Asaas, you will find the "Enable LOG" option in the settings, in the "Debug Log" section.

Just activate the flag, and save your change subsequently.
After I updated the plugin it stopped working, can I download an old version?
Using an old version is not recommended by Asaas, you can always contact us to try to solve problems that are happening.
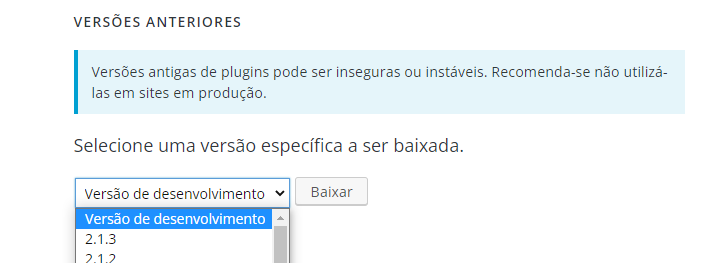
Yes, on the plugin page on the Wordpress site, by clicking on "Advanced View" in the right column and scrolling to the bottom of the page, you find a field to download an old version of the plugin.

An error occurred while processing your order. Contact us.
This is the most common error, and it will be generated whenever there is any failure in processing or in communication of your store with Asaas for charge creation.
To analyze the error, it is necessary that the debugging LOG is enabled, as indicated in the previous section of this manual.
With the LOG already enabled, and after the error is presented, you should access in the administrative panel of your store, the menu WooCommerce > Status, and then, access the "Logs" tab.

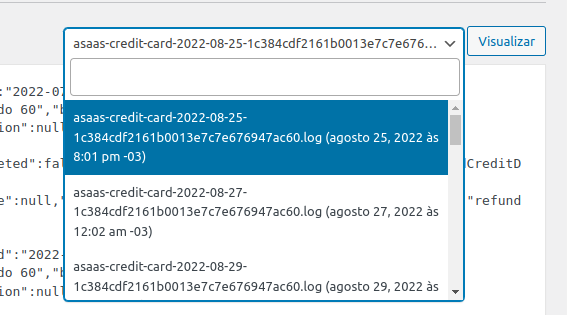
When accessing the Logs tab, you will see in the upper right corner, a select box through which you can navigate between different LOGs.
All LOGs related to Asaas will start with the prefix "asaas", followed by the payment method, which can be "credit-card" for credit card, "ticket" for bank slip, or "pix" for Pix.
In this case, you should select the LOG that corresponds to the payment method that showed an error in your store, also looking for the most recent LOG. The LOG date will be presented right after the prefix, in the format "yyyy-mm-dd".

In the example above, we will be seeing the LOG of credit card transaction errors on 25/08/2022.
With the LOG loaded, go to the end of the LOG. If the error really happened, the line will contain the message "EMERGENCY", followed by the error code presented in the request to Asaas, as in the example below:

With the code returned by Asaas, we will be able to understand a bit more about the structure of the problem in the next sections.
401 Code
The 401 error indicates that the API key you are using is invalid.
In this case, we recommend that you do the following: generate a new API key and redo the process of registering it.
After doing this process, you can try to simulate the creation of a new order to confirm if the problem has been solved.
Also remember that each Asaas environment has its own API key, so validate if you generated the API key in the desired environment, and if the environment is also correctly informed in the Asaas Plugin settings.
404 Code
This error usually occurs when the store is configured in more than one Asaas account, or when the store was used for tests in Sandbox before migrating to production.
As WooCommerce internally links the external ID (Asaas) to the customer, when switching the Asaas account, it is necessary to clear all saved metadata so that conflicts between customer IDs in different environments or accounts do not occur.
To solve this, you will need to access your application's database and run the following query:
delete from wp_usermeta where meta_value like '%cus_000%';This will remove the old data and prevent new conflicts.
500 Code
The 500 error indicates that we made the dispatch, but your system returned us a generic error. In the case of WooCommerce, the most common reasons for this error are the authentication token being different in our system and in Wordpress, or the application being outdated.
If this error occurs, make sure you are using the latest version of the Asaas Plugin and WooCommerce, and re-register your authentication token in Asaas as stated in the plugin settings. After that, just reactivate the queue and wait for the return.
The error will only occur when the same customer data is informed for purchases in different environments, since the ID of the first purchase will already be stored.
Paid Order Didn't Update Status
For the order status update to happen automatically according to payment/due date, it is necessary that the Webhooks are configured and functioning. If you have not done the configuration, navigate to the "Webhook Configuration" section of this manual for more details.
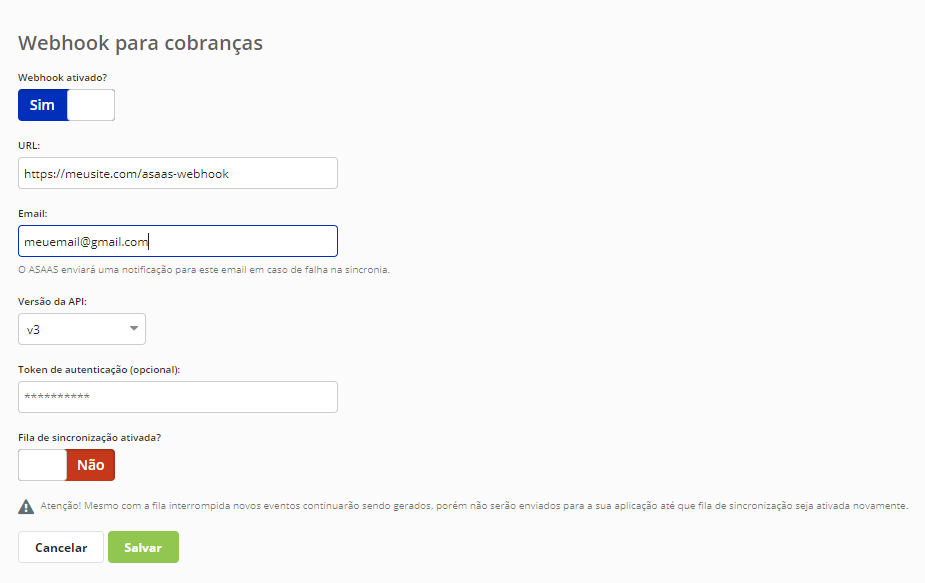
If the webhooks are already configured, the first step for analyzing the problem is to access through your Asaas account, the sent webhook LOGs. For this, go to the user menu and access the Integrations option, then go to the "Webhooks" tab and choose the "Webhook for charges".
If the "Synchronization queue activated?" field is "No", it will indicate a problem, and you will be able to access the "Webhook Logs" tab to view the responses.

When opening the LOG, view in the "Details" column the reason for the error. You can see more details on how to solve the errors by accessing the paused queue guide.
Cloudflare Firewall Block
If you use Cloudflare and are facing problems with blocking the Webhooks, follow these steps.
Error "No Payment Methods Available" at Checkout (Payment Screen)
Since version 8.3 of WooCommerce, a new cart block mechanism for the payment screen has been deployed, which may cause conflicts in plugins that have not yet been made compatible with this structure (such as ours).
Currently, the plugins compatible with these blocks are provided by WooCommerce itself. For the most part, they only support other countries.
We will be working internally to resolve this as quickly as possible, but to make the correction, simply add a shortcode snippet on the checkout page using Gutenberg (Wordpress's standard page editor).
To do this, in your Wordpress Admin panel, go to the Pages > All Pages menu. Locate the "Cart" or "Checkout" page.
Upon accessing it, just enter the shortcode [woocommerce_checkout]. It will look like this:

This way, you will be returning to the previous cart block structure and resolving the situation.
Other Errors
If you are facing errors or have questions about the settings to be made, contact us.
Updated 5 months ago