
Installing the module
How to use Asaas on Nuvemshop
This guide contains all the information required to install and configure the Asaas module for Nuvemshop, allowing Asaas to be used as the payment gateway for processed sales.
The module provides the following payment methods in your store.
- Bank Slip (one-time payment)
- Pix (one-time payment)
- Credit Card (one-time and installments)
When to use the Asaas module
The Asaas module for Nuvemshop is recommended for stores that want to use Asaas as a payment gateway without requiring custom development.
The integration is recommended for operations that want to:
- receive payments via Pix, bank slip, and credit card;
- offer installment payments by credit card;
- use a transparent checkout in the store;
- centralize financial processing in Asaas;
- automate order updates through communication between Nuvemshop and Asaas.
The module is suitable for both small stores and higher-volume operations that want to use a ready-made and official integration.
Important operational impacts
The settings configured during installation directly influence the behavior of store orders.
Some examples:
- the bank slip due date determines how long the customer has to complete the payment;
- Pix expiration may cause the order to be canceled if payment is not made within the defined period;
- installment and interest rules directly affect the amount charged to the customer;
- changes to these settings may impact the shopping experience and sales reconciliation.
For this reason, it is recommended to carefully review the defined parameters before making the store available to customers.
Requirements
To install Asaas (or any other payment method), your store must be at least on the "Essential" Nuvemshop plan. If your store is on the "Free" plan, you can upgrade and test the plan features with a 7-day trial (managed by Nuvemshop).
To view your current plan, click on your store name (in the upper-right corner of the Nuvemshop admin panel) and access the "Plans" option.
Advantages:
- Transparent checkout (Your customer completes the payment without leaving your website).
- CPF/CNPJ validation (The module itself validates whether the provided document number is valid).
- Plug & Play (Installation and configuration in just a few clicks).
- Interest on credit card installment payments (Apply your own interest settings).
- Multiple payment methods (Choose which payment methods you want to offer your customers).
Installing the Asaas module
Installing the Asaas module is simple and can be done in just a few clicks.
Through the official Nuvemshop app store
In your store's admin panel, access the "My Apps" option and then "Boost your business".
You can also access the app store through this link -> https://www.nuvemshop.com.br/loja-aplicativos-nuvem
Once in the store, simply search for "Asaas" in the top search bar and you will find our module.
When clicking "Install app", you must grant Asaas permission to view and manage your customers and store charges. In the displayed modal, simply click "Accept and start using".
Now, you will have two options.
I already have an Asaas account
If you already have an Asaas account, select the "I have an Asaas account" option.
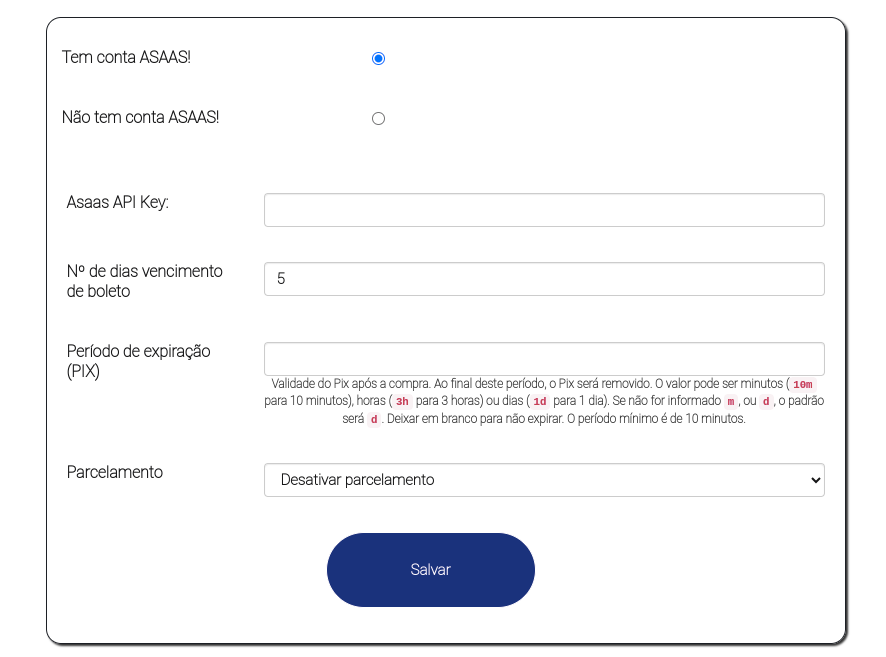
In the "Asaas API Key" field, you must provide the API key from your Asaas account.
To retrieve your API key, access your Asaas account and, in the user menu, select "Integrations". On this screen, click "Generate new API Key" and copy the entire key displayed:

After copying your API Key, return to the Nuvemshop installation page and paste the entire key into the designated field.
Additional settings:
-
Bank slip due date (days): Here you can define a default due date for bank slips generated in your store. The default value is 5, meaning that if your customer purchases today, the bank slip will expire 5 days from today. This field is flexible and can be customized according to your business rules.
-
Pix expiration period: Defines how long the Pix payment will remain available after the purchase. Once this period is reached, the Pix expires and the order may be canceled.
-
The following formats are accepted:
10m→ 10 minutes (minimum allowed);3h→ 3 hours;1d→ 1 day.
-
If no suffix is informed, the value will be interpreted as days. For example:
5→ 5 days;10→ 10 days.
-
Leaving the field blank means that no custom expiration will be defined for Pix.
-
-
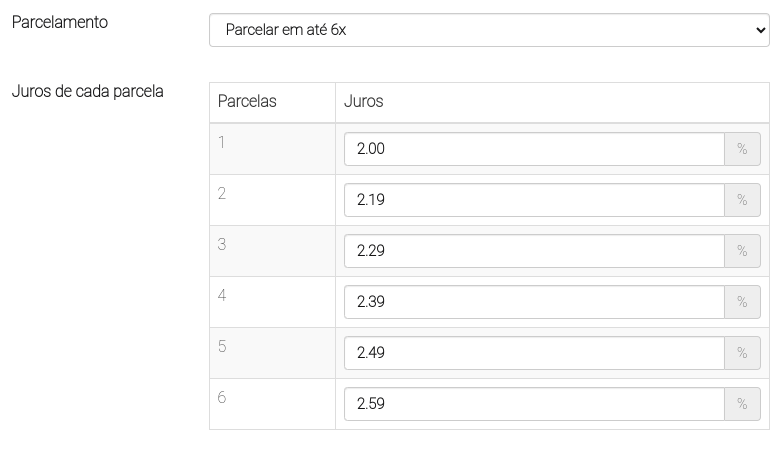
Installments: If you want to allow credit card installments, simply select the maximum number of installments in this field. Once a number of installments is selected, additional fields will appear so you can define the interest applied to each installment option.
- Minimum amount per installment: If installment payments are enabled, this option will also be displayed. Here you can define the minimum amount per installment. If the minimum amount is not reached, the number of available installments may be reduced or installment payments may become unavailable.
After configuring all settings, simply click "Save" to complete the setup.
I do not have an Asaas account yet
If you do not yet have an Asaas account, it is possible to create one directly during the Asaas module installation in Nuvemshop.
By selecting this option, in addition to the module settings displayed in this section, you will also need to provide your company or personal information so that the Asaas account can be created.
You will need to provide: Name, Email, CPF or CNPJ, Mobile Phone, Landline Phone, Address, Number, District, and ZIP Code.
After completing all fields and defining the module settings, simply click "Save" to finalize the configuration.
You will then receive an email from Asaas to define your platform access password. Once configured, you will be able to access Asaas through our website and complete your registration (document submission, additional information, etc.).
Best practices and common errors
Best practices
- Always use a valid production API Key.
- Store the API Key securely.
- Test payment methods before making the store available to customers.
- Review bank slip due dates and Pix expiration settings.
- Validate installment and interest rules before making them available to customers.
Common issues
Invalid API Key
This may occur when the provided key was copied incorrectly or belongs to a different account.
Expired Pix
When the configured expiration period is reached, the payment is no longer available and the order may be canceled.
Installments unavailable
This may occur when the configured minimum amount per installment is not reached.
Order and payment mismatch
In case of temporary communication failures, the order update may occur a few moments after payment confirmation.
Updated 27 days ago