
Automatic Pix
Automatic Pix is an innovative solution that allows for the payment of recurring charges in a fully automated way. This method simplifies your customers' routine because, once the payment is authorized, future transactions occur without the need for manual action from the payer for each new charge.
Feature Under Controlled Access
To enable Automatic Pix in your account, please contact our Integration Success team at [email protected].
The payment journey
The integration flow for Automatic Pix at Asaas is centered on Journey 3, where consent for recurrence is obtained along with the payment of the first installment.
In this journey, the generated QR Code contains both the data for the first payment (which is made immediately) and the necessary data to set up future recurring payments.
First payment flow
Recurring payment flow
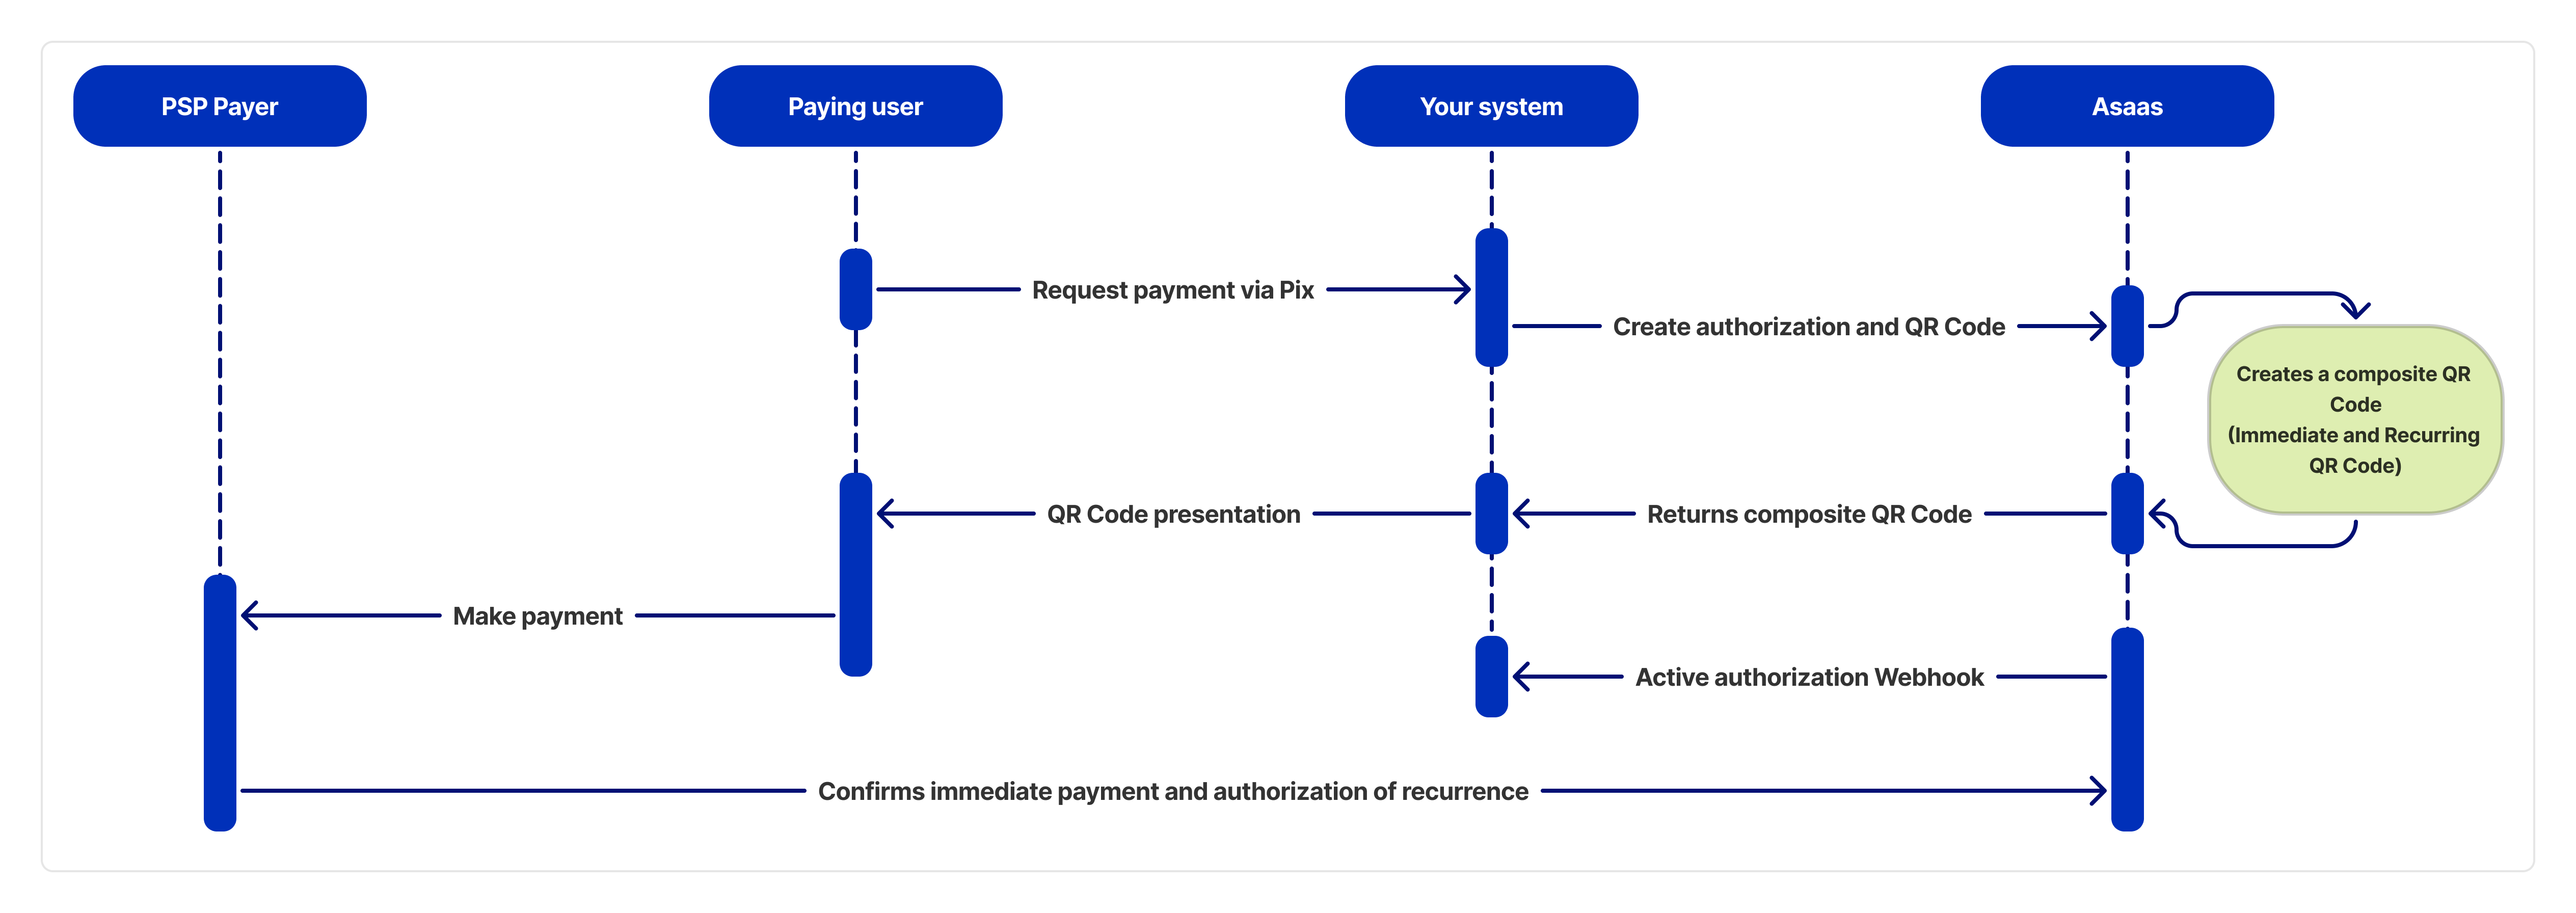
The process can be summarized in the following steps:
- Generation of the Integrated QR Code: Your application requests the creation of a recurring authorization from Asaas. The API returns a composite QR Code.
- Authorization by the Payer: The end customer scans the QR Code and authorizes both the immediate payment and, in the same flow, consents to the future debits.
- Initial Payment Processing: The first payment is settled like a traditional Pix transaction.
- Activation of Recurrence: Upon the successful settlement of the first payment, the recurrence authorization is activated.
- Future Charges: Your application then starts creating the subsequent periodic payments in Asaas, which sends the payment instructions to be automatically debited from the payer's account.
Implementation
Create an authorization with an immediate QR Code
Creating the authorization is the first step. You will make a call to our API to generate a QR Code that already contains the details for the first payment and the recurring authorization.
See the full endpoint reference:
[Create authorization with immediate QR Code]
(Link to be inserted)
Consuming this endpoint will generate a "copy-and-paste" code (payload) that should be presented to your customer (the payer).
In the API response, the immediateQrCode field will be accompanied by a conciliationIdentifier. This same identifier will later be included in the corresponding payment object once the payment is settled, allowing you to reconcile the original authorization with the payment securely.
You will also receive the authorization id. Store this id, as it will be essential for creating future payments and tracking webhooks.
Track the authorization status via webhooks
After the payer gives their consent, Asaas will notify your application via webhook. It is crucial that you configure your system to receive these events.
The main authorization events you should listen for are:
PIX_AUTOMATIC_RECURRING_AUTHORIZATION_CREATED: Informs that the authorization has been requested.
PIX_AUTOMATIC_RECURRING_AUTHORIZATION_ACTIVATED: Confirms that the payer has consented, and you can now create future payments.
PIX_AUTOMATIC_RECURRING_AUTHORIZATION_CANCELLED: Informs that the authorization has been canceled.
Example webhook payload
{
  "event": "PIX_AUTOMATIC_RECURRING_AUTHORIZATION_ACTIVATED",
  "authorization": {
    "id": "d51008fa-e28e-4823-82b4-4b1fcf485229",
    "status": "ACTIVE",
    "customerId": "cus_000006869125",
    "frequency": "MONTHLY",
    "value": 2.00,
    "startDate": "2025-08-01",
    "finishDate": "2028-01-01",
    "immediateQrCode": {
      "conciliationIdentifier": "ASAAS000000000000000000000000550ASA",
      "expirationDate": "2025-07-24 18:00:20"
    }
  }
}
Create the recurring payments
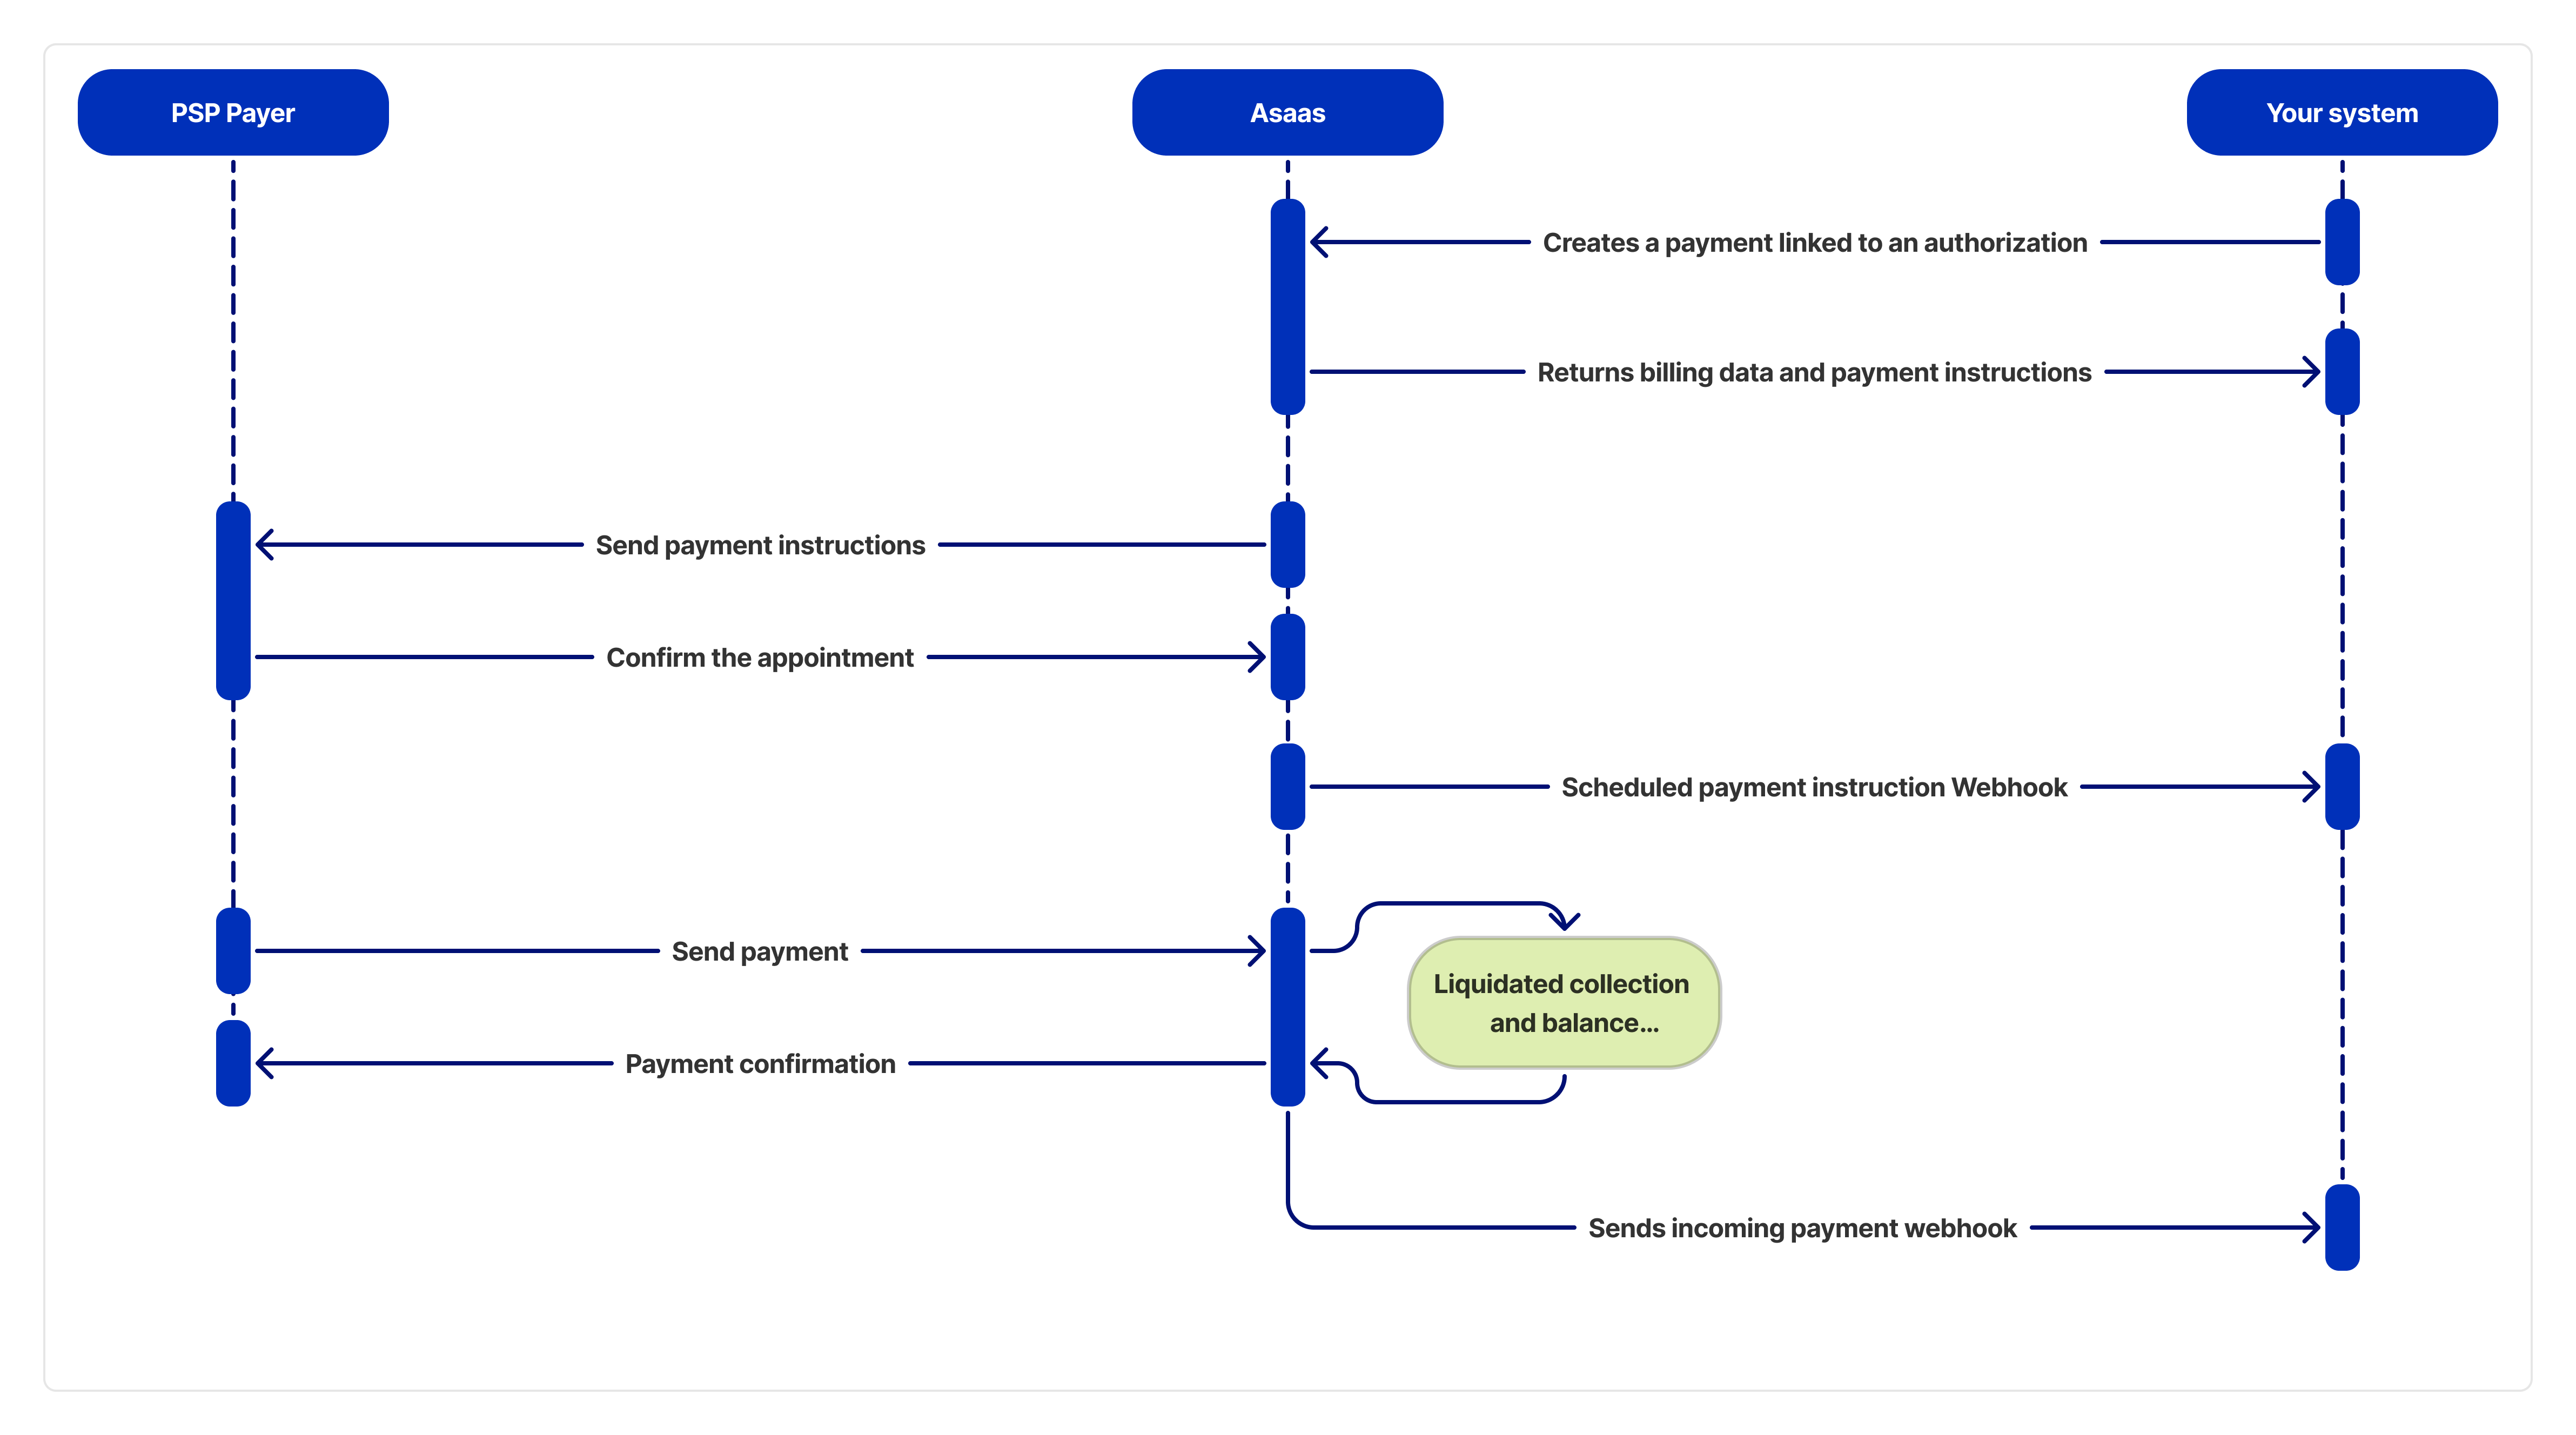
With the authorization in ACTIVE status, your application can start creating the periodic payments in Asaas. The debit will be performed automatically on the payer's account on the due date.
To do this, use the create payment API, providing the new pixAutomaticAuthorizationId field with the authorization identifier obtained in first step.
See the full endpoint reference: [Create payment with Automatic Pix]
(Link to be inserted later)
Interval before expirationThe creation of the payment instruction must adhere to an interval of 2 to 10 business days before the due date of the payment.
Track the payment status via webhooks
For each payment created, Asaas will send a payment instruction to the payer's PSP. You can track the status of this instruction through specific webhooks.
The payment instruction events are:
PIX_AUTOMATIC_RECURRING_PAYMENT_INSTRUCTION_CREATED: Instruction created.
PIX_AUTOMATIC_RECURRING_PAYMENT_INSTRUCTION_SCHEDULED: The transaction was successfully scheduled in the payer's account.
PIX_AUTOMATIC_RECURRING_PAYMENT_INSTRUCTION_REFUSED: The payer refused the debit instruction.
PIX_AUTOMATIC_RECURRING_PAYMENT_INSTRUCTION_CANCELLED: The instruction was canceled.
In addition to these, you will also receive the traditional payment webhooks (PAYMENT_RECEIVED, PAYMENT_OVERDUE, etc.) when the payment is settled.
Example webhook payload
{
  "event": "PIX_AUTOMATIC_RECURRING_PAYMENT_INSTRUCTION_SCHEDULED",
  "paymentInstruction": {
    "id": "f6559451-cb41-4ec6-8487-2cda59a5f184",
    "status": "SCHEDULED",
    "dueDate": "2024-10-04",
    "payment": "pay_080225913252",
    "authorization": {
      "id": "c6b180f0-2196-454c-ac7e-72d662286bd1"
    }
  }
}
Managing authorizations
You can also query and cancel Automatic Pix authorizations via API.
To list or query authorizations:
See the full endpoint references: [List authorizations] and [Query authorization]
(Links to be inserted later)
To cancel an authorization:
See the full endpoint reference: [Cancel authorization]
(Link to be inserted later)
Updated 5 months ago