
Installation
Install and configure the Asaas node in n8n
Install the official Asaas node, configure your API Key, and run a test operation before creating workflows in Production.
ATTENTIONWe always recommend testing in a development environment before installing in production.
Before installing or updating the Community Node:
- back up your workflows;
- validate the installation using the Sandbox environment;
- confirm the compatibility of the n8n and Node.js versions used.
These precautions reduce the risk of interruptions to existing automations during updates.
Before you begin
Check the requirements:
| Requirement | Version or condition |
|---|---|
| n8n | >= 1.0.0 |
| Node.js | >= 20.15.0 |
| Asaas account | Sandbox or Production |
| API Key | Valid for the environment used |
During development, use a Sandbox account and API Key.
1. Install via Community Nodes
In n8n:
- go to Settings → Community Nodes;
- click Install a community node;
- enter the package:
@asaasbr/n8n-nodes-asaas- click Install.
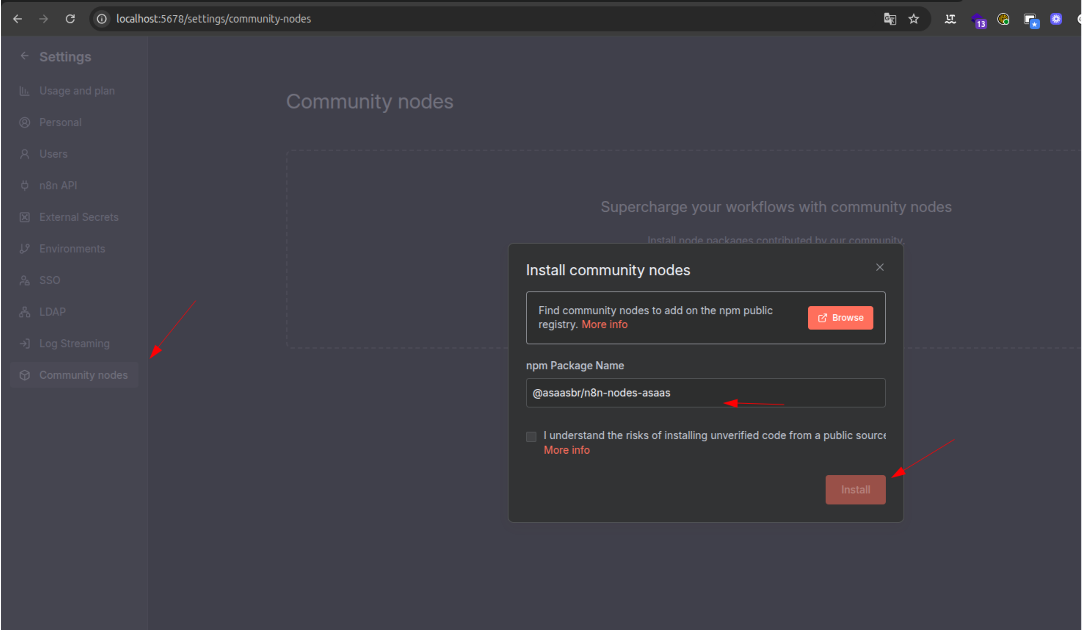
After installation, confirm that the Asaas node is available in n8n. If it does not appear, restart the instance and check again.
2. Configure the credential
In n8n:
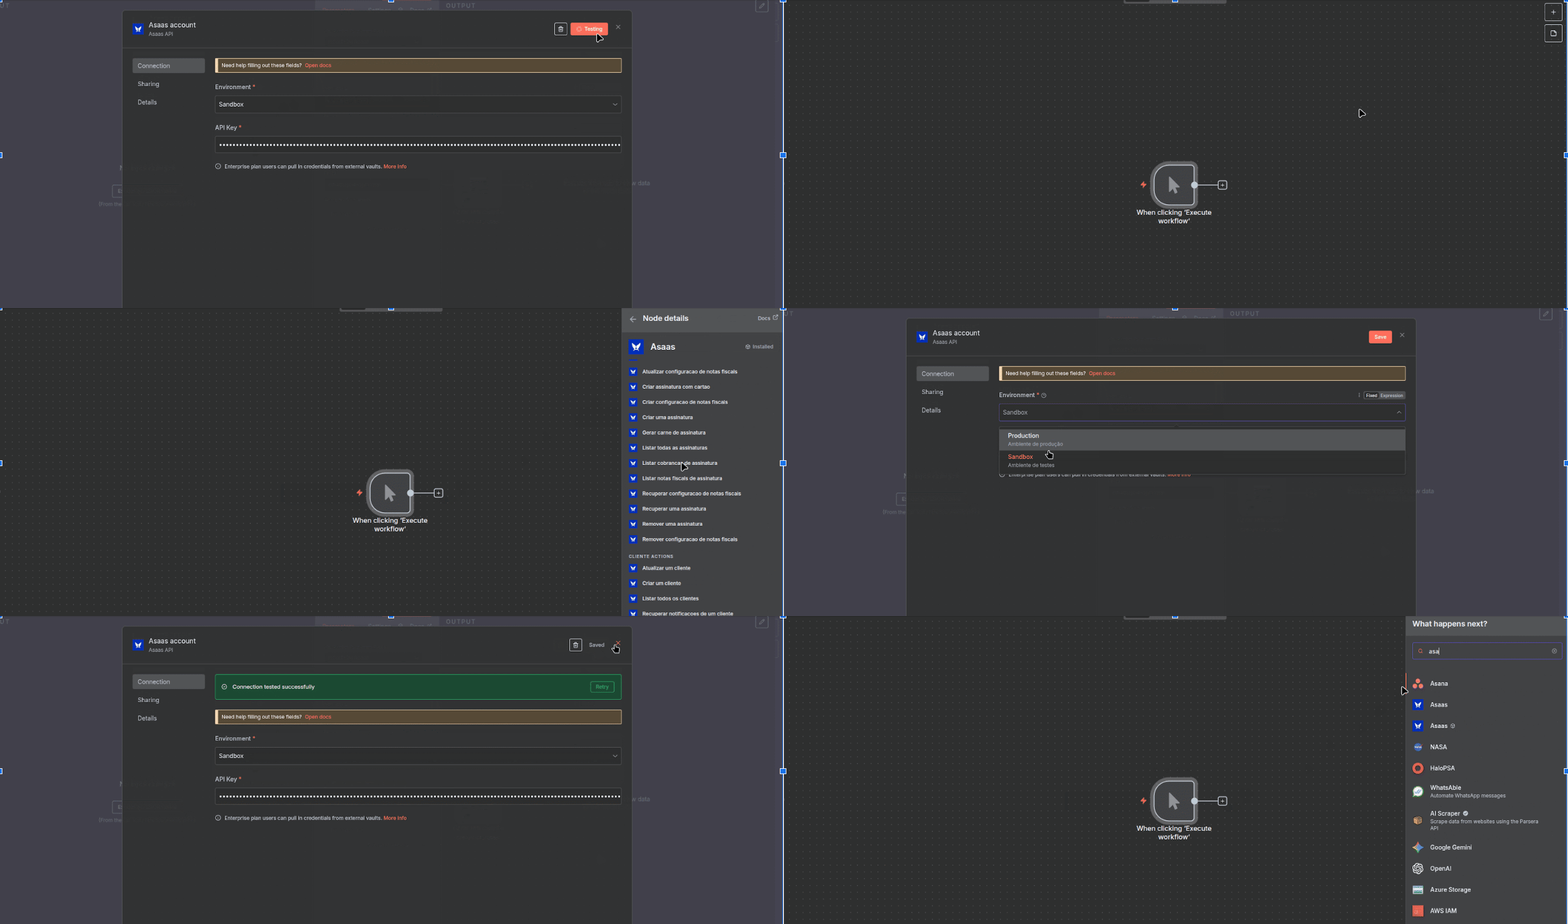
- go to Credentials → Add Credential;
- search for Asaas API;
- enter the API Key;
- select the corresponding environment;
- save the credential.
The main fields are:
| Field | How to fill it in |
|---|---|
| API Key | Key of the Asaas account used by the workflow |
| Environment | Sandbox for testing or Produção (Production) for real operations |
Always use the API Key from the same environment selected in the credential.
3. Validate the installation
Create a test workflow:
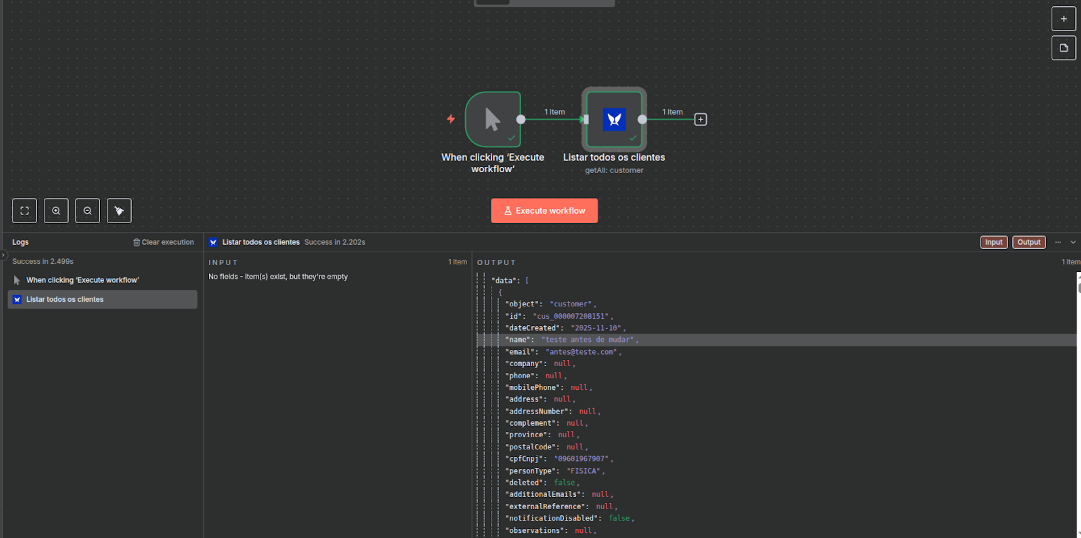
- add the Asaas node to the canvas;
- select the Clientes (Customers) resource;
- choose the Listar Clientes (List Customers) operation;
- select the credential you created;
- execute the node.
Expected result
The operation should return the customers of the account used, without an authentication error.
This result confirms that:
- the node was installed;
- the credential was loaded;
- the environment and the API Key match;
- the workflow can communicate with the Asaas API.
After installation
The node can be part of workflows started manually, by other systems, or by Webhooks.
For example:
%%{init: {"flowchart": {"nodeSpacing": 18,"rankSpacing": 24,"diagramPadding": 4,"padding": 7}}}%%
flowchart TD
    A["Receive a Webhook"] --> B["Execute the Asaas node"]
    B --> C["List customers"]
    C --> D["Evaluate the result"]
    D --> E["Continue the workflow"]

    classDef inicio fill:#DBEAFE,stroke:#2563EB,color:#1E3A8A,stroke-width:3px
    classDef validacao fill:#E0F2FE,stroke:#0284C7,color:#0C4A6E,stroke-width:2px
    classDef sucesso fill:#DCFCE7,stroke:#16A34A,color:#14532D,stroke-width:3px

    class A inicio
    class B,C,D validacao
    class E sucesso

    linkStyle default stroke:#94A3B8,stroke-width:2px
Operations executed by the node follow the same rules, permissions, validations, and limits as the Asaas API.
For features that are not yet available in the official node, use n8n's HTTP Request with the Asaas API.
Manual installation
In a self-hosted n8n installation, the package can also be installed via npm:
npm install @asaasbr/n8n-nodes-asaasValidate the n8n and Node.js versions before installing or updating the package.
Common errors
| Situation | What to check |
|---|---|
| Invalid credential | API Key, key validity, and configured environment |
| Unauthorized operation | Permissions available for the API Key |
| Node does not appear | Package installation and whether the instance needs a restart |
| Cannot connect to Asaas | Match between Environment and API Key |
| Operation returns a validation error | Fields and rules of the operation used |
Errors returned by the API are also made available to the workflow so they can be handled with n8n features.
Next steps
Updated 3 days ago